
Is More Focal Length Always Better for Astrophotography?
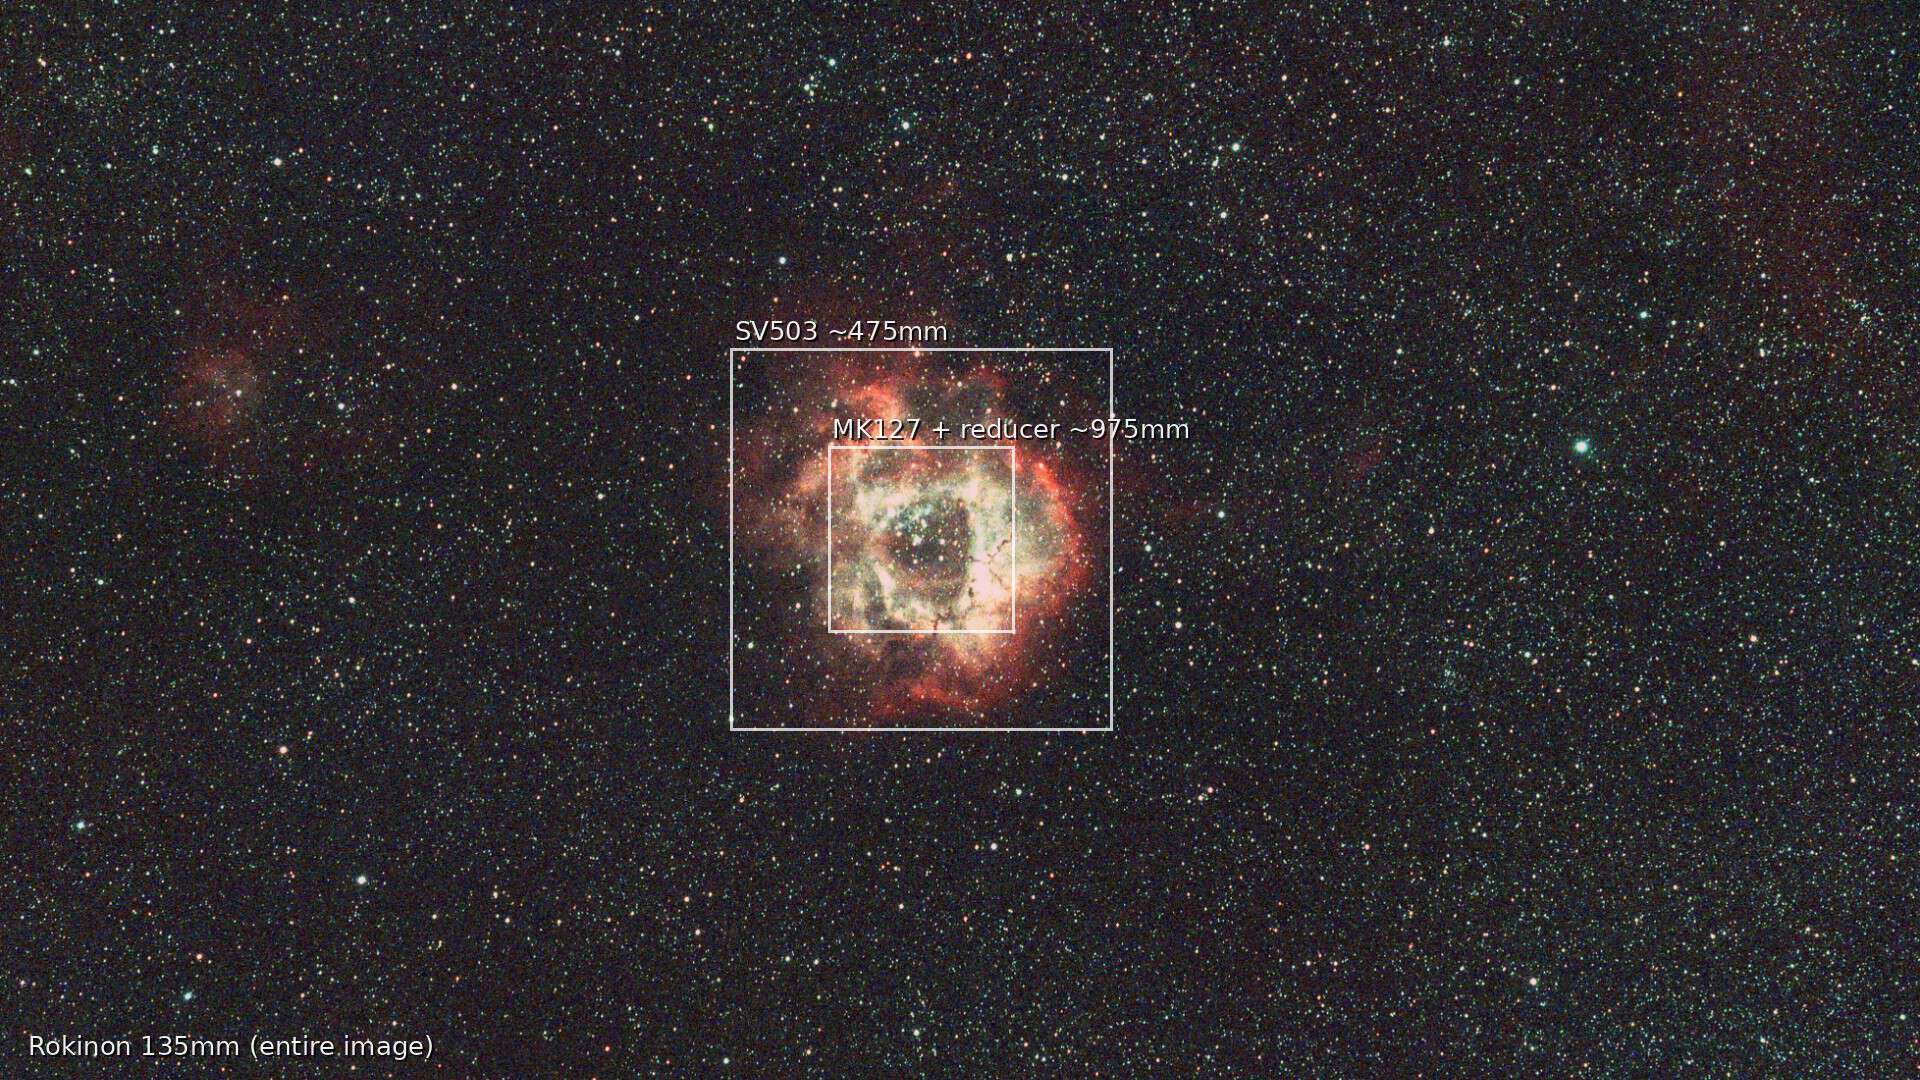
I’ve shot the Rosette Nebula twice with two very different focal lengths. The first time was with my Sony ZV-E10 and a Rokinon 135mm lens. The second was with my ZWO ASI533MC Pro on the SVBONY SV503, a 70mm refractor sitting right around 475mm.
The longer focal length won on detail, no contest. The Rosette filled the frame, and structure that was barely a hint at 135mm finally showed up. So you’d expect me to say the telescope made the better image.
I’m not going to say that. Both images are from the same Bortle 9 Florida backyard, and I like them for completely different reasons. That tension is the whole point of this post.
No, more focal length isn’t always better for astrophotography. The right focal length depends on your target’s size, what you want the image to show (fine detail or the whole object in context), and how ready the rest of your rig is. If your goal is composition, a longer focal length doesn’t just fail to help; it actively works against you.
Let’s dive into what focal length really changes, why “better” depends on your goal, and how to pick the right one before you ever head outside.
What Focal Length Actually Changes in Your Image
Focal length decides how much sky lands on your sensor. A short focal length captures a wide patch of sky. A long one captures a small patch and spreads it across the same number of pixels.
That’s why people call it “zoom,” and I use that word loosely too. But nothing is being magnified in the camera-lens sense. You’re trading field of view for image scale: less sky, more pixels per piece of it.
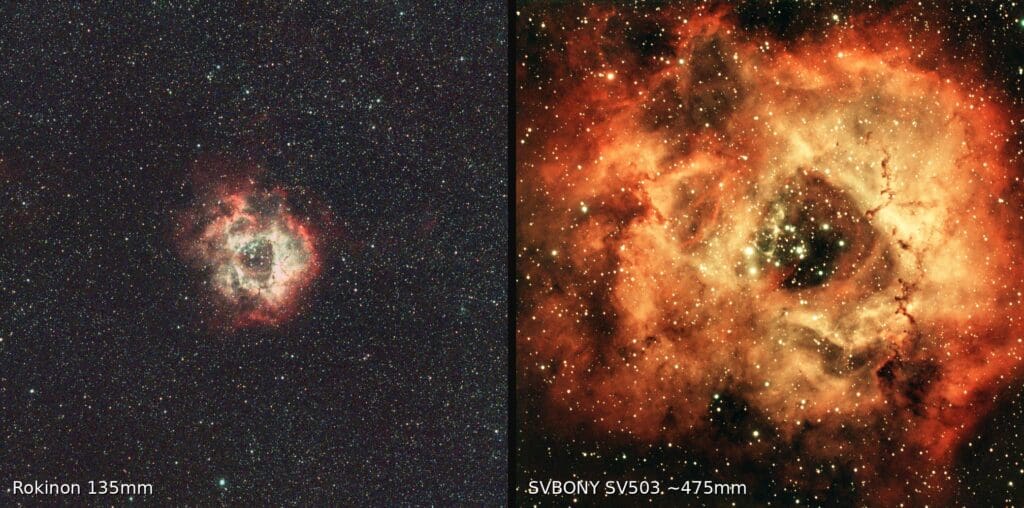
My Rosette images show the trade clearly. They were shot on different cameras, but the comparison here is just the size of the object and the composition around it. At 135mm, the nebula sits in a field full of stars, and you can tell exactly where it lives in the sky. At 475mm, the Rosette takes over the frame, and the structure inside the gas starts to show.
You gain detail. You also lose the surrounding stars and the context that made the wide shot feel like a place. Neither image is wrong. They’re answering different questions.
“Better” Depends on Your Goal for the Image
Before you ask which focal length is better, ask what you want the image to do. In my experience, most goals fall into one of four buckets:
- Maximum detail. You want to resolve as much fine structure as your sky and rig allow.
- A recognizable object. You want anyone to look at it and know exactly what it is.
- Visible internal structure. You want to see what’s happening inside the object, not just its outline.
- Surrounding composition. You want the object placed in its neighborhood of stars and dust.
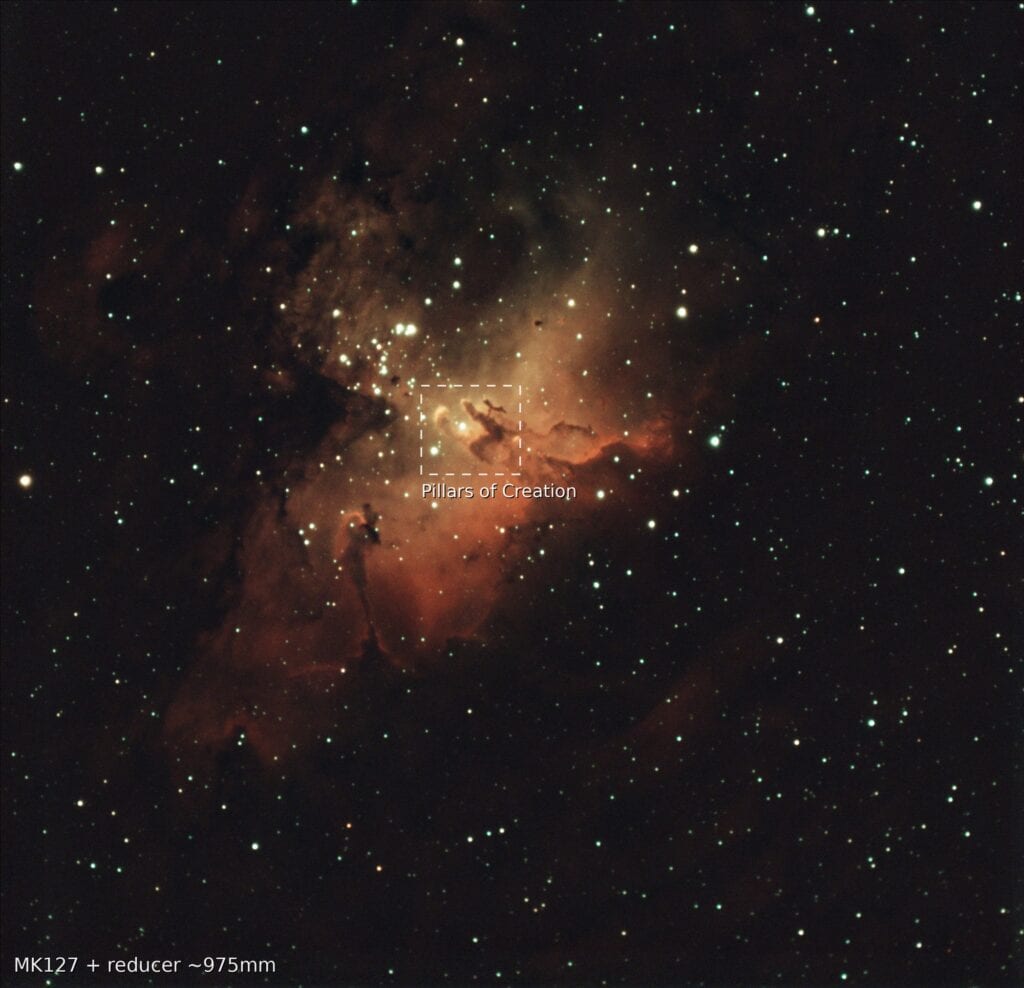
The Eagle Nebula is the best example I have. I shot it with my MK127, a 127mm Maksutov I usually run at about 975mm with its reducer. The whole Eagle fits in the frame, and the Pillars of Creation are there, but they’re too small to show real detail.
That’s not a failure of my image. It’s a focal length decision. An even longer focal length would pull in the Pillars, but the rest of the Eagle would spill off the frame. At 975mm, I get the entire Eagle, and the Pillars stay small. Same target, two different photographs, and both are valid.
Now flip it around. Put that same MK127 on the Rosette or the North American Nebula. You’d get detail in one small section, but without the rest of the object for reference, it could be hard to tell what you’re even looking at. Same focal length, different target, completely different result.
Here’s the part that turns “it depends” into something sharper: if your goal is composition and you choose the longer focal length, that focal length actively hindered you. It isn’t neutral. It took away the exact thing you were after.
If composition is the side that pulls you in, I wrote about starting there in Why I Chose Wide-Field Deep-Sky Astrophotography First, which is really the composition side of this same argument.
Why Longer Focal Lengths Magnify Every Mistake
Your telescope or lens is only one part of your rig. As focal length goes up, everything else has to keep up with it: tracking, polar alignment, focus, and the conditions around you.
Think about looking at something with your eyes versus through binoculars. Turn your head a little with just your eyes, and the scene barely changes. Make that same small movement with binoculars, and the object can jump right out of view.
Tracking works the same way. If your mount drifts slightly off rate, a short focal length may never show it. At a long focal length, that same tiny drift smears your stars.
The numbers make it concrete. Here’s the image scale each of my focal lengths gives on the ASI533MC Pro (arcseconds of sky per pixel; smaller means each pixel covers less sky):
| Optic | Focal length | Image scale on the ASI533 |
|---|---|---|
| Rokinon 135mm lens | 135mm | ~5.7″/pixel |
| SVBONY SV503 | ~475mm | ~1.7″/pixel |
| MK127 with reducer | ~975mm | ~0.8″/pixel |
The 135mm row shows that lens on the ASI533 so the comparison stays even; my actual 135mm Rosette was shot on the ZV-E10, which lands in about the same place. Going from the 135mm to the reduced MK127, each pixel covers about one seventh as much sky. An error that shifts your image by one arcsecond barely registers at 135mm. At 975mm, it covers more than a full pixel.
Here’s what gets amplified as you go longer:
- Tracking errors. Small mount imperfections become visible star trails.
- Polar alignment. Slight misalignment shows up faster as drift and field rotation.
- Focus. A near-miss that looks fine wide becomes soft stars up close.
- Seeing. Atmospheric turbulence blurs fine detail you’re now trying to resolve.
- Vibration and wind. Every bump and gust travels further across your frame.
I’ll be honest about my own experience here. My backyard blocks Polaris, so I started with the ASIAIR Plus plate solving my polar alignment and the Star Adventurer GTi tracking from day one. I haven’t had the nightmare session where focal length broke my setup. I wrote about how that alignment works in Polar Alignment Without Polaris: How Plate Solving Gets It Done.
Where I did feel the difference was focus. When I moved to the MK127, accurate focus mattered more for a good final image. Focus matters at every focal length, but the margin for error got noticeably thinner.
I added an automatic focuser at the same time I moved to the MK127, so my experience focusing it by hand is limited. That’s the practical takeaway: when you step up in focal length, budget for focus control, not just the scope. One caveat from using mine: an autofocuser needs visible stars before it can calculate focus, so it isn’t a cold-start fix.
None of this is only a beginner problem, either. Seeing, wind, and temperature swings affect seasoned imagers too. The difference is that experienced imagers have the basics dialed in, so the environment is the only variable left. Gear can’t fix shaky fundamentals; a longer focal length just makes them easier to see.
Does Focal Length Matter More Under Bortle 9 Skies?
In my experience, not as much as you’d think. Under a Bortle 9 sky, filters matter far more than focal length. Without them, you’ll probably struggle at any focal length, so my L-Pro and SV220 are close to mandatory.
You’ll often read that longer, slower scopes need a lot more integration time to get a usable result. I haven’t seen that. Between the SV503 and the MK127, I haven’t noticed a difference in the sub length or total integration I need.
Light pollution also hasn’t stopped me from imaging a single target yet. I’ve only imaged from this one location, so I can’t tell you how much better things look from a dark site. What I can tell you is that the city sky hasn’t been the thing deciding my focal length. My goal for the image has.
How to Choose the Right Focal Length Before You Go Out
I haven’t had a session where my focal length couldn’t handle the target. That’s not luck. It comes from planning before I ever set up.
Here’s the process I use.
- Look at what other imagers used. Search for your target and study images you like, along with the gear behind them. You don’t need their exact equipment. But if someone shot it at a certain focal length and you love the composition, you want to be in that range.
- Check for heavy cropping. Many great images are cropped hard so the object fills more of the frame. If you spot that, adjust your expectations. Your uncropped frame won’t look like their finished image, and that’s fine.
- Compare the target’s size to your field of view. Look up how large the object is in the sky and compare it to what your camera and optic can frame.
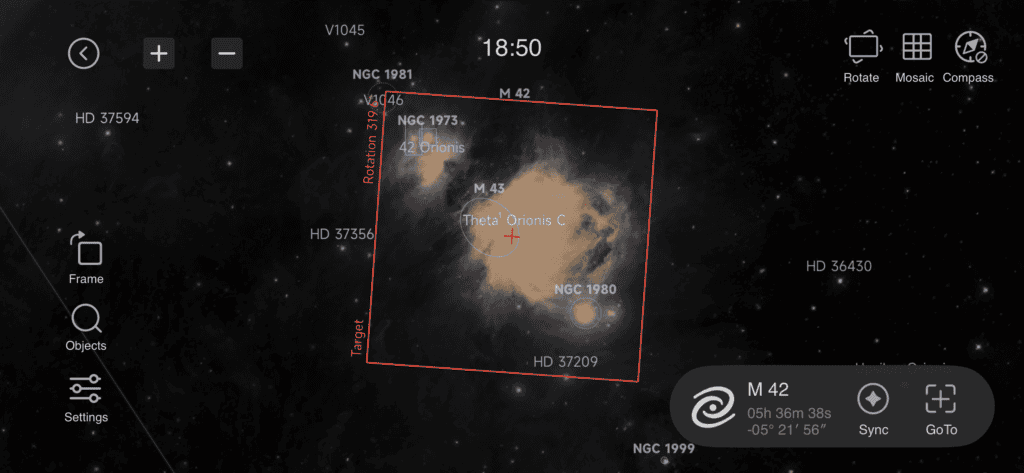
- Preview the framing during setup. The ASIAIR Plus targeting tool estimates your framing from your focal length and camera. It’s a quick final check before you commit a night to it, and one step in my session workflow from start to finish.
This research pays off once the session starts, too. When my first subs come in, I have a reference point. If something looks off, I notice it right away instead of finding out during processing.
It has also shaped every optic I’ve added. Shooting the Rosette at 135mm left me wanting more detail, which led me to the SV503. Researching small galaxies showed me they needed a longer focal length, which led me to the MK127. Each step was driven by a specific target I wanted, not by the idea that bigger is better.
Final Thoughts
A longer focal length can bring you more detail, but it won’t fix anything else in your setup. It makes every other issue easier to see. If your alignment, focus, or tracking isn’t solid, or you can’t refocus through the night, a bigger scope can set your progress back, even on a small target.
So start with your goal. Decide whether you want the whole object in its setting or a close look at one piece of it, then pick the focal length that serves that.
And if you’re working with one camera and one lens right now, you’re not behind. Getting the basics right and understanding them will take your images further than being able to reach every object in the sky. The sky over your Bortle 9 backyard or balcony has plenty to offer at the focal length you already own.
Tagged
In This Post
Current Setup
Equipment links are affiliate links – they help support this site at no cost to you.