
The first time I picked targets on my own, I got it wrong. Then I upgraded my gear and got it wrong again, just in the opposite direction.
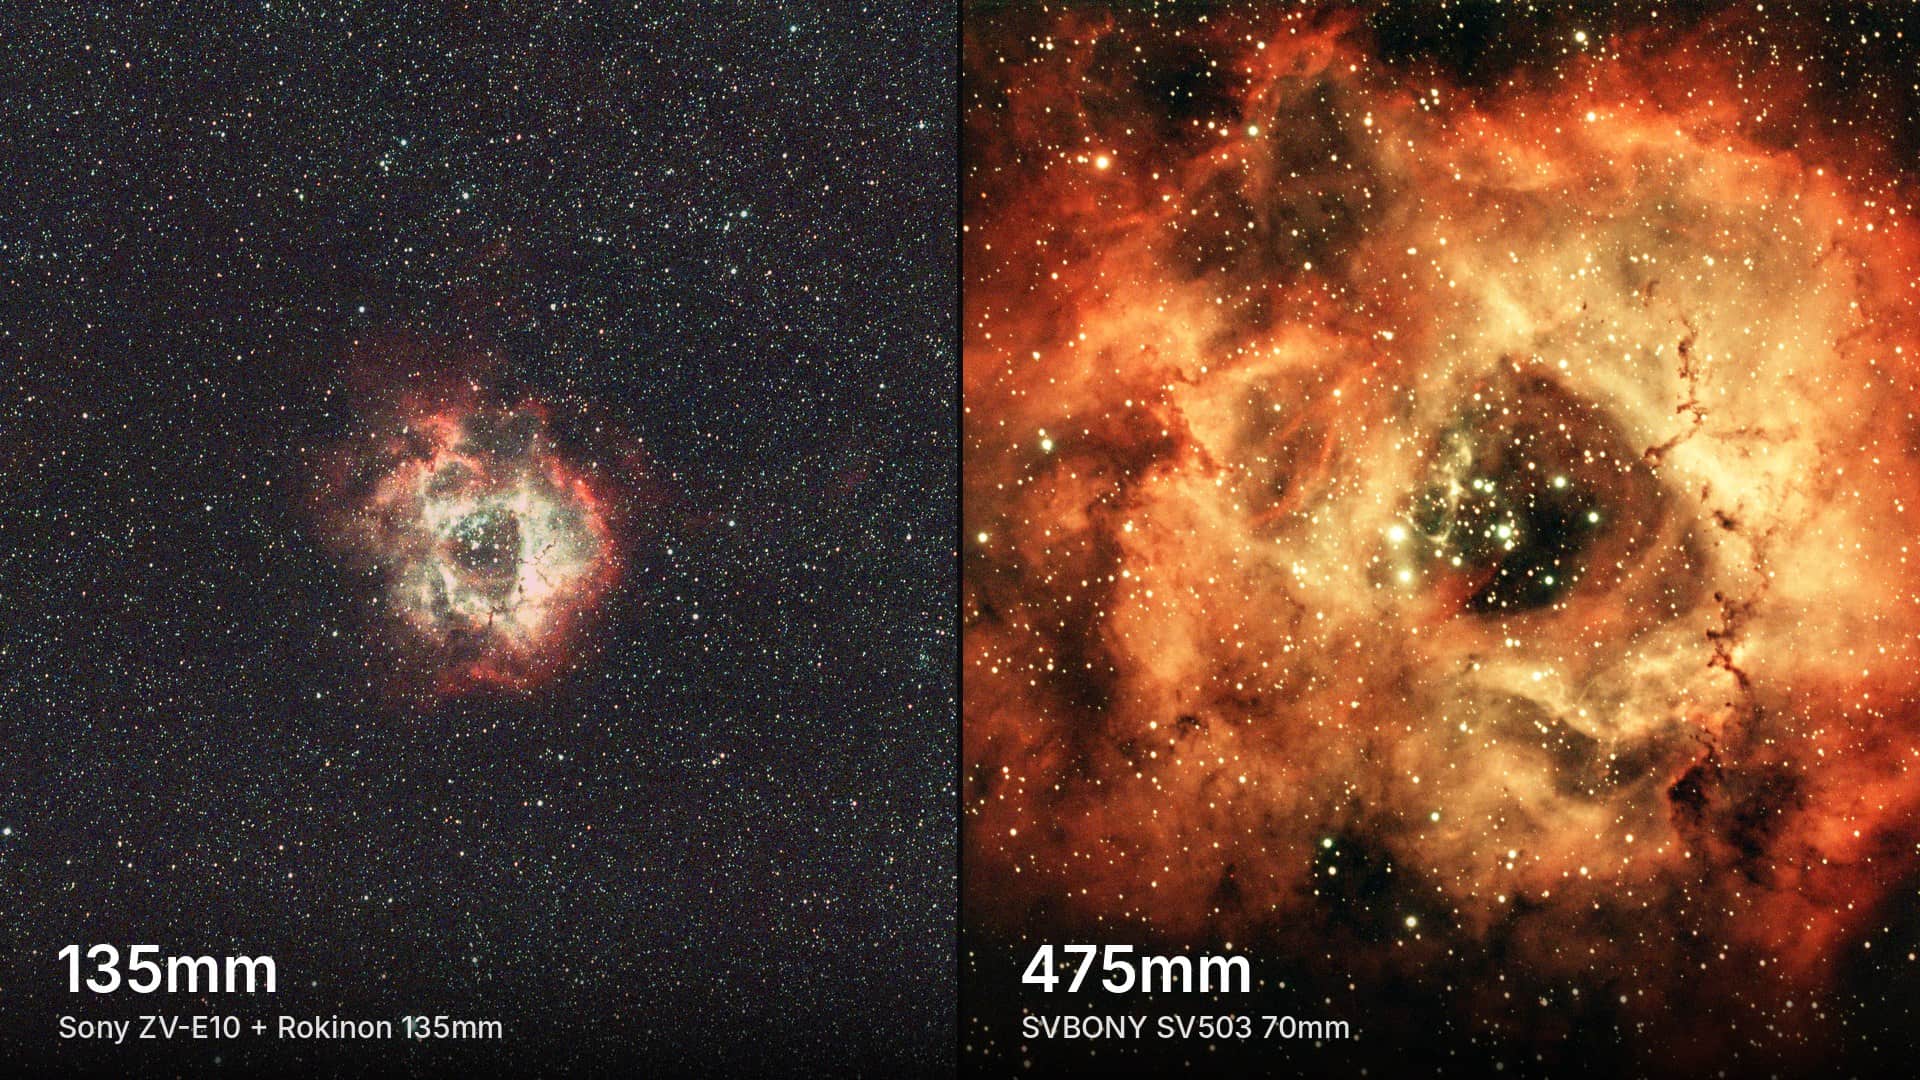
With my Sony ZV-E10 and Rokinon 135mm lens, I kept going after small targets that ended up as tiny smudges lost in a field of stars. When I moved up to the SVBONY SV503 at around 475mm, I swung the other way and chased big nebulas that spilled right off the edges of the frame. Same mistake, flipped.
Sizing wasn’t the only trap, either. Under a Bortle 9 Florida sky, pairing the wrong filter with the wrong target can quietly sink a whole night before you realize anything went wrong.
So if you’re scrolling through lists of nebulas and galaxies wondering where to point your setup, here’s how I think about it now.
To choose an astrophotography target, match three things together: your equipment, your goal for the image, and the target itself. Check that it fits your field of view, that your filter suits the target type, and that you have enough sky time to collect data. When you’re starting out, pick targets your current gear and sky already handle well.
Let’s dive into how to make that match.
Decide What You Want From the Target First
Before you check a single number, decide what kind of image you’re after. Do you want the target to fill the entire frame? Or do you want some context, with the surrounding stars and sky telling part of the story?
The same target can be a great fit or a poor one depending on that answer.
The Rosette Nebula is a good example. At 135mm, the rose shape sits inside a busy star field, small but recognizable. Through the SV503, it fills far more of the frame and the structure in the core starts to show. Neither version is wrong. They’re just different images.
The Eagle Nebula works the same way. Do you want the whole nebula with its surroundings, or do you want detail in the Pillars of Creation tucked inside it? Those two goals call for very different focal lengths.
This is why more reach isn’t automatically better. If you want to dig into that idea, I covered it in Is More Focal Length Always Better for Astrophotography?
How to Check Whether a Target Fits Your Field of View
Once you know your goal, you need to see how the target will actually sit in your frame. Having a visual is key here, because fit really comes down to composition.
Here are the three ways I check it.
Stellarium. The desktop version lets you enter your camera and telescope or lens details, and it draws your frame right on the sky. Pan around the target and you’ll get a real feel for how it will be framed before you ever set up.
AI tools. ChatGPT or Claude can place field-of-view boxes for different equipment over an image. This works especially well over a photo you’ve already taken of the target. If you shot something at 135mm and wonder how it would look through a telescope, you can see both frames side by side.
The math. You can calculate your field of view and compare it against the target’s angular size. This works, and it will tell you whether something fits. What it won’t tell you is how it will look, which is the part that actually matters for composition.
Match Your Filter to the Target Type
This is where a Bortle 9 sky really shapes your choices.
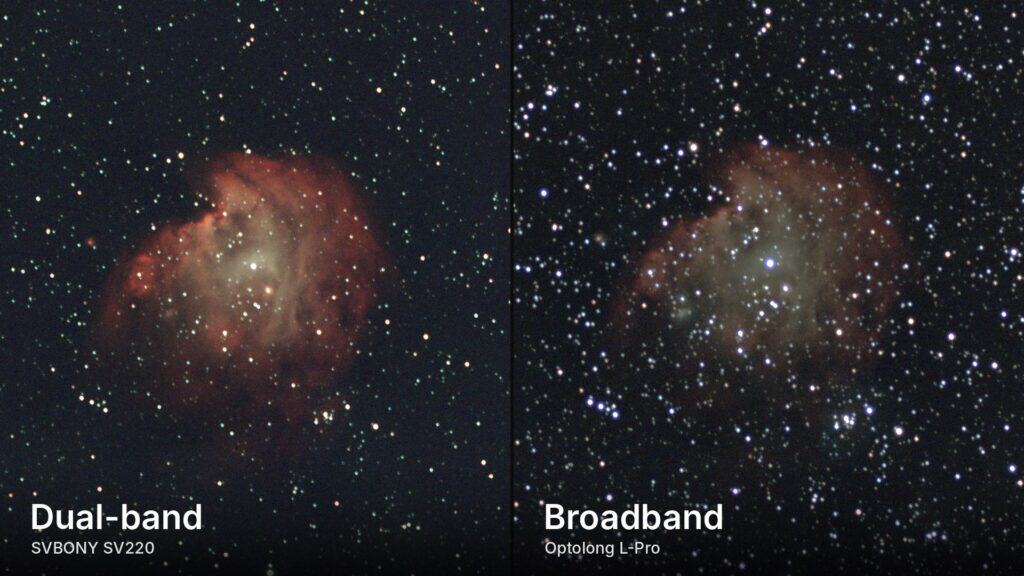
A dual-band filter like my SVBONY SV220 passes narrow slices of light that emission nebulas give off, especially in the deep red, while blocking most of the light pollution spectrum. On an emission nebula, it’s a huge help.
On a galaxy or reflection nebula, it won’t serve you well. Those targets shine across a broad range of light, so a dual-band filter throws away most of the signal you’re trying to collect.
For reflection nebulas, galaxies, and star clusters, a broadband light pollution filter like the Optolong L-Pro is the better match.
The two filters can also work together. A dual-band filter often alters star colors, so capturing your stars separately through the L-Pro and combining them can improve the final image of an emission target.
I break this down further in How to Choose the Right Astrophotography Filters for Your Target.
Be Honest About How Much Sky Time You Have
From my backyard, trees block the north and west, and the house blocks part of the south. Some targets only spend an hour or so in my open patch of sky before they slip behind something.
That forces a decision: are you willing to image one target across multiple nights, or do you want to spend one long night on a single target? Neither choice is wrong. You just need to understand the timeline involved.
If a target is up all night, you can get a decent image in a single session and improve it over one or two more nights. If you only get an hour a night, and there’s no guarantee of clear nights in a row (hello, Florida weather), that same target could take weeks or even months.
One way to make short windows work is to image a target while it’s available, then move on to a second one for the rest of the night. I walk through that approach in my post on imaging two targets in one night.
Why Beginners Should Chase Easy Wins
I’ll be honest: I haven’t hit the wall of a target that’s simply too faint for my sky yet. Most of what I’ve imaged so far has been emission nebulas, and a dual-band filter gives you a lot of grace there.
What I have learned is where faint targets put the pressure. They need longer exposures, and longer exposures expose every tracking error you have. If your tracking isn’t dialed in, those long exposures become difficult fast. A pricier camera can’t fix a mount that isn’t tracking well.
And capturing is only half the battle. The other half is stretching your data in processing, and you can’t stretch data that isn’t good to begin with.
Long term, the targets you want to go after should drive your gear choices. But starting out, choosing targets that fit your current gear and observing space sets you up for success. Easy wins teach you the whole workflow, from capture to a finished image.
Two Beginner-Friendly Targets to Start With
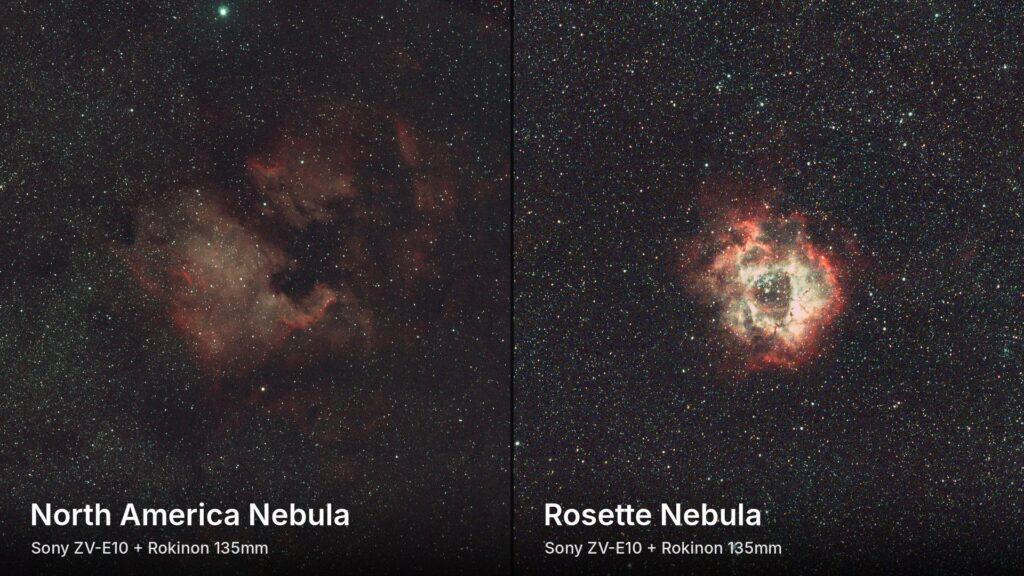
The best picks depend on the time of year, but here are two I imaged myself with the ZV-E10, the 135mm lens, and a dual-band filter.
The North America Nebula. This is an emission nebula, so a dual-band filter is your best friend in heavy light pollution. It cuts out most of the light pollution spectrum while letting the nebula’s light through. It isn’t the brightest nebula out there, but it’s bright enough that you don’t need very long exposures, which matters a lot with an uncooled camera. It’s also large, so even at 135mm it fills a good portion of the frame.
The Rosette Nebula. Also an emission nebula, with the same filter benefits. It sits smaller in the frame than the North America Nebula, but its distinct shape is easy to recognize at 135mm. You won’t get the detail of my SV503 version, but you’ll still capture flecks of detail, the distinct core, and the rose shape of the outer regions. It also sits in a star-dense region, which makes the wider composition at 135mm interesting and dynamic.
Final Thoughts
Choosing a target isn’t about finding the most impressive object in the sky. It’s about finding the one where your gear, your goal, and your sky all line up.
You don’t need a telescope to start. A DSLR or mirrorless camera with a camera lens is enough to bring home real images, as long as you pick targets that play to what you have.
Once you’ve picked your target, the next step is planning the night itself. My astrophotography session workflow from start to finish walks through exactly how I do that.
Tagged
In This Post
Current Setup
Equipment links are affiliate links – they help support this site at no cost to you.